Tutorial
NEW!
Works with multi-device setup!
- Common usage example:
- Set up your hardware
- Configure the pressure controller.
- Set pressure manually
- Run a pre-built trajectory on the controller
- Plot Results
Run these commands in a linux terminal. If you are using an IPython console (like in spyder), replace python with run at the beginning of commands.
Common usage example:
Commands in the console
# Build your trajectory
python build_traj.py example/setpoint_traj_demo

# Configure the pressure controller with the default profile
#    This step only needs to be run when you are updating parameters.
#    The last profile to be configured is always loaded on startup
python config.py default

# Load the built trajectory onto the controller
python send_pre_built.py example/setpoint_traj_demo

# Run the trajectory 1 time, and speed-stretch by 2.5x (faster)
python run_pre_built.py 1 2.5
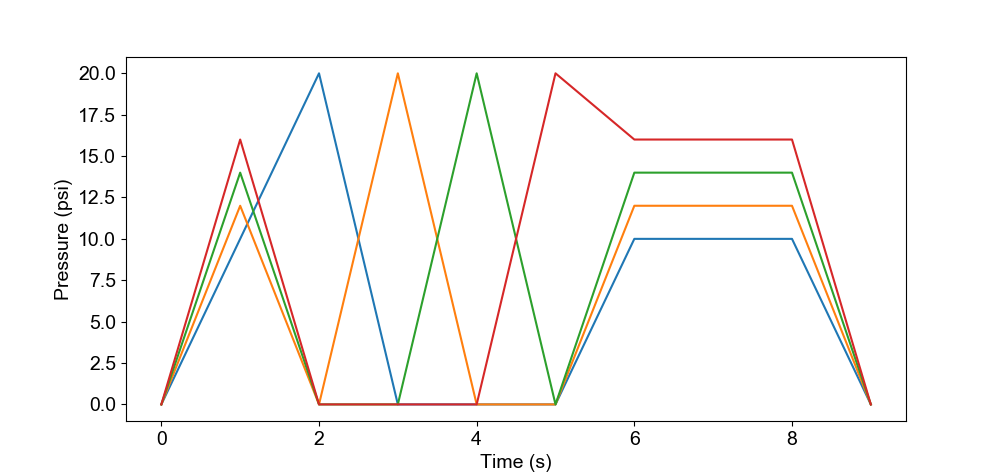
example/setpoint_traj_demo.yaml:
settings:
    traj_type: 'interp'  # Types include: 'waveform', 'interp'


# Place all of the type-specific settings in here
config:
    interp_type: none   # can be: 'linear', 'cubic'
    setpoints: # Setpoints are only used if you are doing an interpolation
        # [time (sec), pressure 1,2...N (psi)]
        main:
            - [0.0,   10, 12, 14,  16]
            - [1.0,    20, 0, 0,  0]
            - [2.0,   0, 20, 0,  0]
            - [3.0,     0, 0, 20, 0]
            - [4.0,     0, 0, 0, 20]
            - [5.0,    10, 12, 14, 16]

        # The prefix and suffix are optional.
        # If you don't want them, simply exclude them and the program will know what to do.
        prefix:
            - [0.000,   0, 0, 0,  0]
            - [1.0,    10, 12, 14,  16]

        suffix:
            - [2.000,   10, 12, 14,  16]
            - [3.0,  0, 0, 0,  0]
Output
Set up your hardware
Follow the instructions in Hardware Setup.
Once configured, you can pretend you have only one pressure controller with n channels. If you have multiple devices configured together, then you treat them as one controller with the total number of channels of all devices combined. This python interface does the hard work of splitting up commands to all the controllers, so for all intents and purposes, you just pretend you have one controller with a bunch of channels.
Configure the pressure controller.
This sets a bunch of configuration settings on the controller (like which channels are on, PID gains, etc.).
- Create a config file in the
configfolder.- Configuration files are “.yaml” files with a few specific fields (see examples in the
configfolder) - config files must be stored in the
configfolder.
- Configuration files are “.yaml” files with a few specific fields (see examples in the
python config.py [config_file]- config_file - name of the configuration file you want to use. It can include folders too.
Set pressure manually
python set_pressure.py [p1] [p2] ... [pn]
- no arguments - Pressure is set to 0
- p1 - Pressure [in psi] - To set all pressure equal, send one value
- p1, p2, …,pn - Pressure [in psi] - To set pressure individually, the number of pressure sent must equal the number of channels (n).
Once running, use keyboard keys to move the pressure up and down.
Run a pre-built trajectory on the controller
Set up a trajectory
- Create a trajectory setup file in the
traj_setupfolder.- Trajectory setup files are “.yaml” files with a few specific fields (see examples in the
traj_setup/examplefolder) - Trajectory setup files must be stored in the
traj_setupfolder (you can use subfolders too)
- Trajectory setup files are “.yaml” files with a few specific fields (see examples in the
- There are three basic parts in a trajectory
- main - The looping part
- prefix - Run once at the start of the trajectory
- suffix - Run once after the looping part is finished.
-
To forgo suffixes or prefixes, just leave them blank in the file (or delete them entirely)
- A Note about smoothness:
- In the “main” part of the trajectory, the first and last lines must be the same if you want to make a smooth looping trajectory. At the lowest level, the controller jumps directly from the last line to the first line when looping.
- For a smooth prefix » main transition, the last line in the “prefix” and first line of the “main” should be the same.
- Transitions to the suffix are handled dynamically, starting from the setpoint at the exact time the suffix is requested.
- If the main part finishes, the final line of “main” is copied to time 0.0s in the suffix
- If the main part is interrupted, the current setpoint (including interpolated values) is copied to time 0.0s of the suffix.
- In the example above, we dynamically transition to the first line of the suffix from wherever the setpoint currently is over 2.0 seconds.
Build a trajectory
python build_traj.py [traj_profile]- traj_profile - name of trajectory you want to build. It can include folders too.
- The trajectory is built, and a “.traj” file is saved in the
traj_builtfolder
Load the pre-built trajectory onto the controller
python send_pre_built.py [traj_profile]
- traj_profile - name of trajectory you just built
You must build trajectories from setup files before you can send them. Do not try to create trajectory files yourself.
Run the current trajectory
Execute the pressure trajectory you just sent
python run_pre_built.py [num_cycles] [speed_factor]
- num_cycles - Loop the main part of the trajectory this number of times. (Set to -1 for endless loop)
- speed_factor - Speed-stretch a trajectory (larger speed factor runs the trajectory faster)
This command also saves the incoming data from the pressure controller in a csv:
[time in ms] [setpoints  p1 ...... pn]  [measured  p1 ....... pn]  [input pressure] [command echos]
3848,         0.00, 0.00, 0.00, 0.00,    0.10, 0.05, 0.03, -0.07,   30.00,           , ,
3858,         0.50, 0.50, 0.50, 0.50,    0.45, 0.51, 0.46, 0.39,    29.50,           , ,
3868,         , , , ,                    , , , ,                    ,                time, 10
Spaces are shown in this example for clarity, but in real csv’s there are no spaces.
- For pressures, data will always be returned from all channels, even if they are turned off in the configuration.
- If multiple controllers are configured together, one file per hardware device is created, with the suffix “_00X” appended to the output filename for each device.
- Data for all devices is automatically synced.
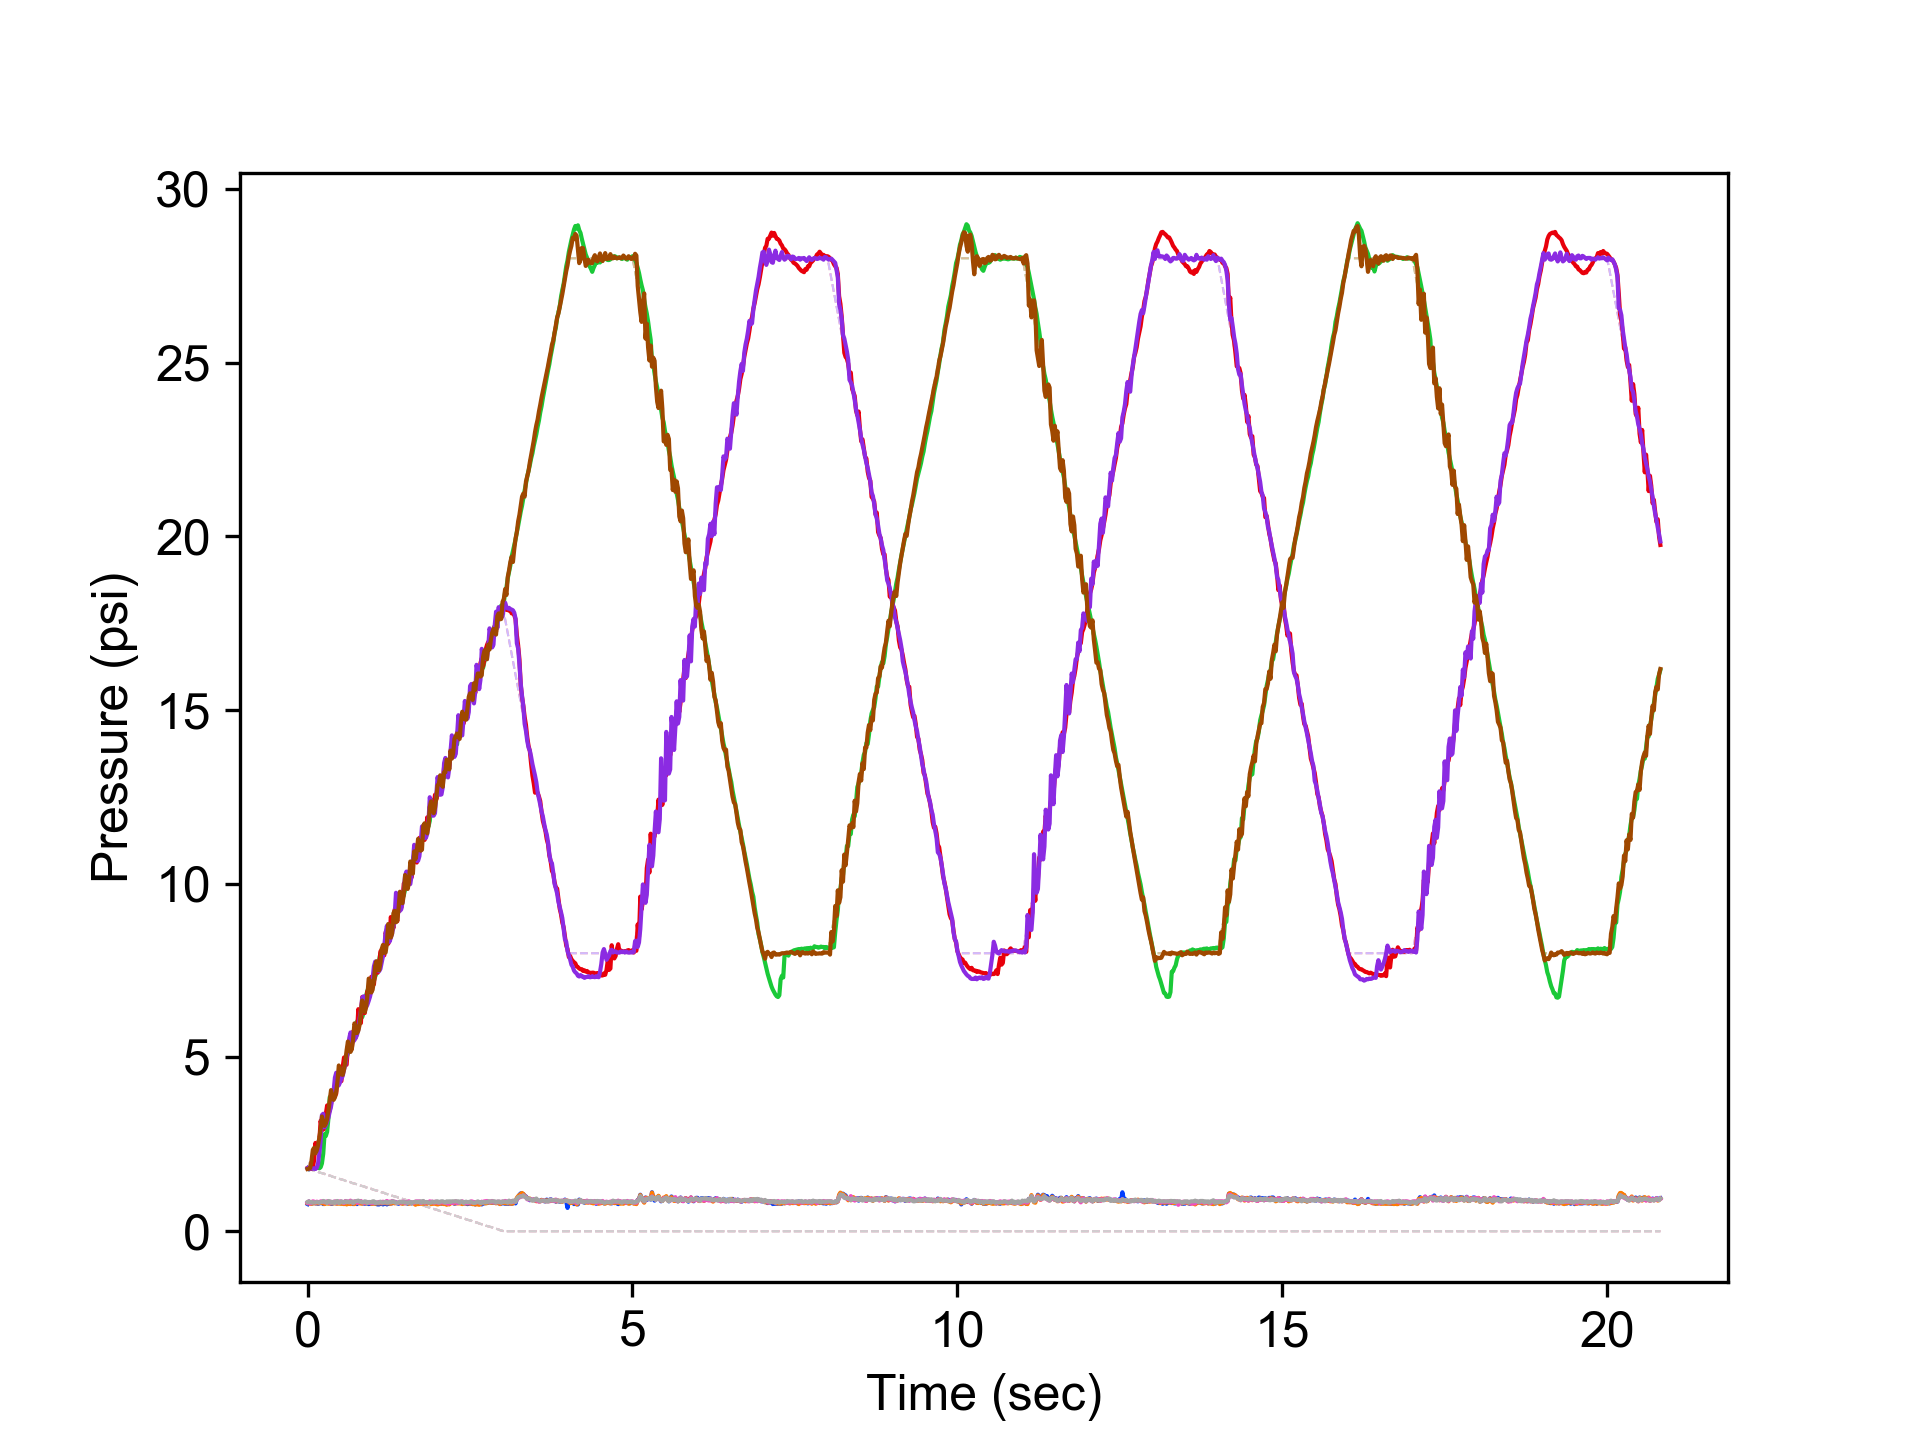
Plot Results
Since data is saved in CSV files, it’s easy to plot them with your favorite plotting utility.